Difference between revisions of "Getting Started With Python Programming"
m (Testing) |
|||
| (21 intermediate revisions by 11 users not shown) | |||
| Line 1: | Line 1: | ||
== Important == | == Important == | ||
| − | This guide takes you through the process of getting started with programming using the Python programming language. | + | This guide takes you through the process of getting started with programming using the Python programming language. As of January 2025, Python is the language used in AoPS Online's Introductory and Intermediate Programming classes. |
| − | The sections flow from one to the next so it's recommended to read through this document in order from top to bottom. If you are interested in learning the basics of | + | The sections flow from one to the next so it's recommended to read through this document in order from top to bottom. If you are interested in learning the basics of Python, check out the Intro to Python class. |
If you find that this is too easy, '''make sure you've read everything through (at least roughly)''', and check out [[Basic Programming With Python]]. | If you find that this is too easy, '''make sure you've read everything through (at least roughly)''', and check out [[Basic Programming With Python]]. | ||
| Line 8: | Line 8: | ||
==Installing Python== | ==Installing Python== | ||
| − | '''Note:''' ''Introduction to Programming with Python'' students on a Chromebook should use an online Python | + | '''Note:''' ''Introduction to Programming with Python'' students on a Chromebook should use an online Python interpreter such as [https://repl.it/languages/python3 this one]. There is not a good way for students to install Python on a Chromebook and use it as a learning environment. Students in ''Intermediate Programming with Python'' should not use a Chromebook because they will need the tkinter GUI toolkit for the class. Instead, ''Intermediate Programming with Python'' students should install Python on a regular computer. |
Python is a useful and popular computer programming language. Confusingly, Python has two major versions (2 and 3) and they are not fully compatible. We recommend using the most recent release of version 3. (This is the version that our [http://www.artofproblemsolving.com/School/courseinfo.php?course_id=python1 Introduction to Programming with Python course] uses -- if you are enrolled in that class, you '''must''' have Python 3.) Python 2 has reached end-of-life, so its use is strongly discouraged. | Python is a useful and popular computer programming language. Confusingly, Python has two major versions (2 and 3) and they are not fully compatible. We recommend using the most recent release of version 3. (This is the version that our [http://www.artofproblemsolving.com/School/courseinfo.php?course_id=python1 Introduction to Programming with Python course] uses -- if you are enrolled in that class, you '''must''' have Python 3.) Python 2 has reached end-of-life, so its use is strongly discouraged. | ||
| − | #Go to the Python download page at http://www.python.org/downloads. Near the top of the page, there will be a list of download links for the Python | + | #Go to the Python download page at http://www.python.org/downloads. Near the top of the page, there will be a list of download links for the Python installer. (As of September 2024 the version is Python 3.12.6.) If you are given multiple options, click on the link that corresponds to your computer type (Windows or Mac, 32-bit or 64-bit -- if you're not sure, use the 32-bit version.) Some browsers will save the file automatically, others may pop up a box asking you if you want to save the file, in which case you should click the "save file" option. Depending on how your browser is configured, you may be asked where to save the file. If this is the case, keep track of where you save the installer. |
#Find where the installer was downloaded and double click on it to run it. On most browsers, you should simply be able to double-click the installer from the browser's "Downloads" window or menu. You may also have to click "Run" or "Yes" to a security window -- do this if necessary. | #Find where the installer was downloaded and double click on it to run it. On most browsers, you should simply be able to double-click the installer from the browser's "Downloads" window or menu. You may also have to click "Run" or "Yes" to a security window -- do this if necessary. | ||
#The setup wizard should launch. You should just click "Next" for every option in the setup wizard (i.e. use the defaults) unless you have some specific reason not to. | #The setup wizard should launch. You should just click "Next" for every option in the setup wizard (i.e. use the defaults) unless you have some specific reason not to. | ||
| Line 18: | Line 18: | ||
#If you like everything dark, you may go to Options->Configure IDLE->Highlights and change it to the built-in dark theme | #If you like everything dark, you may go to Options->Configure IDLE->Highlights and change it to the built-in dark theme | ||
===For GNU/Linux users=== | ===For GNU/Linux users=== | ||
| − | + | Most major distributions should come with a python interpreter preinstalled. If not, you can install them using the commands corresponding to your distro. | |
| − | + | <ol> | |
| − | + | <li>For Debian derivatives (Ubuntu, Mint):</li> | |
| − | + | \$ sudo apt install python3 | |
| + | <li>For Fedora derivatives (RHEL, CentOS, Nobara):</li> | ||
| + | \$ sudo dnf install python3 | ||
| + | <li>For Arch derivatives (Manjaro, SteamOS):</li> | ||
| + | \$ sudo pacman -Syu python3 | ||
| + | </ol> | ||
| + | |||
| + | |||
| + | This course uses IDLE as the main editor. While it is not strictly required, it can be installed using the following commands: | ||
| + | <ol> | ||
| + | <li>For Debian derivatives (Ubuntu, Mint):</li> | ||
| + | \$ sudo apt install idle-python3.9 | ||
| + | <li>For Fedora derivatives (RHEL, CentOS, Nobara):</li> | ||
| + | \$ sudo dnf install python3-idle | ||
| + | <li>For Arch derivatives (Manjaro, SteamOS):</li> | ||
| + | \$ sudo pacman -Syu python-idle | ||
| + | </ol> | ||
==Programming== | ==Programming== | ||
| Line 45: | Line 61: | ||
The program that you'll use to run Python is called IDLE. It may be listed on your computer as "IDLE (Python GUI)". | The program that you'll use to run Python is called IDLE. It may be listed on your computer as "IDLE (Python GUI)". | ||
* On a Mac, IDLE should be in the Applications folder. | * On a Mac, IDLE should be in the Applications folder. | ||
| − | * On Windows, IDLE should be accessible from the Start menu in a folder named "Python 3. | + | * On Windows, IDLE should be accessible from the Start menu in a folder named "Python 3.11" (or something similar). |
The icon for IDLE looks something like this [[File:Idleicon.png]] or this [[File:Idleiconmac.png]]. | The icon for IDLE looks something like this [[File:Idleicon.png]] or this [[File:Idleiconmac.png]]. | ||
| Line 54: | Line 70: | ||
(The screenshots in this article are taken using IDLE on a Mac with the font increased. Thus IDLE may look a little bit different for you but should still function similarly.) | (The screenshots in this article are taken using IDLE on a Mac with the font increased. Thus IDLE may look a little bit different for you but should still function similarly.) | ||
| − | Note that the first line is the version of Python, which is 3.1.2 in the screenshot but should be 3. | + | Note that the first line is the version of Python, which is 3.1.2 in the screenshot but should be 3.11.something (as of Jan 2023) if you installed it as directed above. Another thing to note is that in the lower right-hand corner of the Python Shell you can see that it says "Ln: 4 Col: 4". This is just telling you where in the document your cursor is. In this case, it's on line 4 and over in column 4. (The line and column number may be slightly different for your installation.) |
When you start up Python on a Mac, you might get a warning like the following: | When you start up Python on a Mac, you might get a warning like the following: | ||
| Line 90: | Line 106: | ||
For most programming needs, you'll want to edit your program in a separate document and then run it. Luckily, IDLE comes with its own built-in text editor. | For most programming needs, you'll want to edit your program in a separate document and then run it. Luckily, IDLE comes with its own built-in text editor. | ||
| − | To get started, go to the File menu of the Python Shell and click on "New | + | To get started, go to the File menu of the Python Shell and click on "New File". This should give you a blank document with the title "Untitled" as shown below: |
[[File:Idle2-6.png]] | [[File:Idle2-6.png]] | ||
| Line 107: | Line 123: | ||
Note that as you type, the keywords like "for", "in", "range" and "print" get colored in orange or purple! | Note that as you type, the keywords like "for", "in", "range" and "print" get colored in orange or purple! | ||
| − | Also, note that you must copy the exact same indentation. Even though the editor automatically indents for you when you type <code>for i in range(1, 51):</code>, the proper indentation in Python is super important! If you don't do it correctly, the program will not | + | Also, note that you must copy the exact same indentation. Even though the editor automatically indents for you when you type <code>for i in range(1, 51):</code>, the proper indentation in Python is super important! If you don't do it correctly, the program will not run correctly. |
You can indent by pressing Tab on your keyboard. | You can indent by pressing Tab on your keyboard. | ||
| Line 142: | Line 158: | ||
Being one of the most popular editors, supporting every language and an extensive extension collection! | Being one of the most popular editors, supporting every language and an extensive extension collection! | ||
| − | + | Install the free version of Pycharm at | |
| − | https://www.jetbrains.com/pycharm/download/#section=mac for | + | * https://www.jetbrains.com/pycharm/download/#section=mac for Macs, |
| − | https://www.jetbrains.com/pycharm/download/#section=windows for | + | * https://www.jetbrains.com/pycharm/download/#section=windows for Windows, |
| − | https://www.jetbrains.com/pycharm/download/#section=linux for | + | * https://www.jetbrains.com/pycharm/download/#section=linux for Linux. |
==What's Next?== | ==What's Next?== | ||
| Line 156: | Line 172: | ||
* [[Basic Programming With Python]] | * [[Basic Programming With Python]] | ||
* [[Pycharm]] | * [[Pycharm]] | ||
| + | * [[Beestar Computer Science]] (5th-8th) | ||
| + | * [[Computer science competitions]] | ||
Latest revision as of 12:37, 14 January 2025
Contents
Important
This guide takes you through the process of getting started with programming using the Python programming language. As of January 2025, Python is the language used in AoPS Online's Introductory and Intermediate Programming classes.
The sections flow from one to the next so it's recommended to read through this document in order from top to bottom. If you are interested in learning the basics of Python, check out the Intro to Python class.
If you find that this is too easy, make sure you've read everything through (at least roughly), and check out Basic Programming With Python.
Installing Python
Note: Introduction to Programming with Python students on a Chromebook should use an online Python interpreter such as this one. There is not a good way for students to install Python on a Chromebook and use it as a learning environment. Students in Intermediate Programming with Python should not use a Chromebook because they will need the tkinter GUI toolkit for the class. Instead, Intermediate Programming with Python students should install Python on a regular computer.
Python is a useful and popular computer programming language. Confusingly, Python has two major versions (2 and 3) and they are not fully compatible. We recommend using the most recent release of version 3. (This is the version that our Introduction to Programming with Python course uses -- if you are enrolled in that class, you must have Python 3.) Python 2 has reached end-of-life, so its use is strongly discouraged.
- Go to the Python download page at http://www.python.org/downloads. Near the top of the page, there will be a list of download links for the Python installer. (As of September 2024 the version is Python 3.12.6.) If you are given multiple options, click on the link that corresponds to your computer type (Windows or Mac, 32-bit or 64-bit -- if you're not sure, use the 32-bit version.) Some browsers will save the file automatically, others may pop up a box asking you if you want to save the file, in which case you should click the "save file" option. Depending on how your browser is configured, you may be asked where to save the file. If this is the case, keep track of where you save the installer.
- Find where the installer was downloaded and double click on it to run it. On most browsers, you should simply be able to double-click the installer from the browser's "Downloads" window or menu. You may also have to click "Run" or "Yes" to a security window -- do this if necessary.
- The setup wizard should launch. You should just click "Next" for every option in the setup wizard (i.e. use the defaults) unless you have some specific reason not to.
- Familiarize yourself with the Python shell and IDLE text editor by running through the two sections below.
- If you like everything dark, you may go to Options->Configure IDLE->Highlights and change it to the built-in dark theme
For GNU/Linux users
Most major distributions should come with a python interpreter preinstalled. If not, you can install them using the commands corresponding to your distro.
- For Debian derivatives (Ubuntu, Mint):
- For Fedora derivatives (RHEL, CentOS, Nobara):
- For Arch derivatives (Manjaro, SteamOS):
$ sudo apt install python3
$ sudo dnf install python3
$ sudo pacman -Syu python3
This course uses IDLE as the main editor. While it is not strictly required, it can be installed using the following commands:
- For Debian derivatives (Ubuntu, Mint):
- For Fedora derivatives (RHEL, CentOS, Nobara):
- For Arch derivatives (Manjaro, SteamOS):
$ sudo apt install idle-python3.9
$ sudo dnf install python3-idle
$ sudo pacman -Syu python-idle
Programming
Before you can code, you must understand data types.
Data Types
int - an integer - Ex: 0, 1, 2
float - a floating point decimal - Ex: 1.2, 2., .2
str - a string (think text) - Ex: "Hi", 'Name?'
list - a list of data types - Ex: ["Nice", 3, 5.4]
dict - a dictionary - Ex: {'one':'uno', 'two': 'dos', 'three': 'tres'}
set - an unordered list of unique data types - Ex: {1,2,3}
Yay, it's time to program! The next few sections will talk about some very basic programming. We will program a few programs as a demonstration.
Using the Python Shell
The program that you'll use to run Python is called IDLE. It may be listed on your computer as "IDLE (Python GUI)".
- On a Mac, IDLE should be in the Applications folder.
- On Windows, IDLE should be accessible from the Start menu in a folder named "Python 3.11" (or something similar).
The icon for IDLE looks something like this ![]() or this
or this ![]() .
.
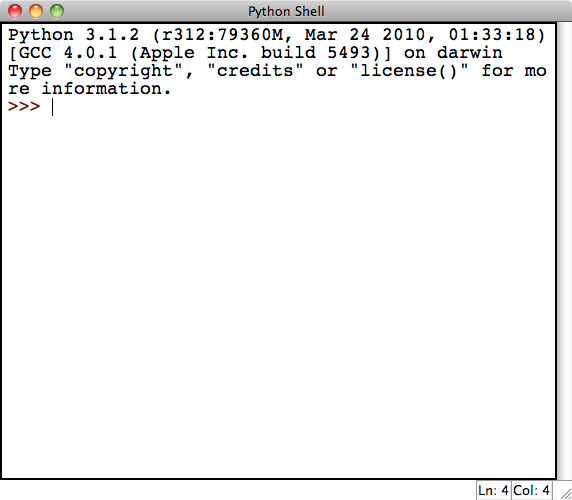
When you first open IDLE, you'll see the Python Shell (the numbers on your shell might be different than those shown below):
(The screenshots in this article are taken using IDLE on a Mac with the font increased. Thus IDLE may look a little bit different for you but should still function similarly.)
Note that the first line is the version of Python, which is 3.1.2 in the screenshot but should be 3.11.something (as of Jan 2023) if you installed it as directed above. Another thing to note is that in the lower right-hand corner of the Python Shell you can see that it says "Ln: 4 Col: 4". This is just telling you where in the document your cursor is. In this case, it's on line 4 and over in column 4. (The line and column number may be slightly different for your installation.)
When you start up Python on a Mac, you might get a warning like the following:
- >>> WARNING: The version of Tcl/Tk (8.5.9) in use may be unstable.
- Visit http://www.python.org/download/mac/tcltk/ for current information.
If you get this warning, try one or both of the following. (IMPORTANT: you only need to do this if you get the warning printed above when you start IDLE for the first time. If you don't get the warning, then everything is good to go.)
1) Update your Python to version 3.9.0+, 3.8.0+, or 3.7.2+. They have tkinter built into the native IDLE.
2) Update a graphics driver on your computer. Follow the link shown above and download and install the ActiveTcl driver that's recommended for the version of OS X that your Mac is running. This most likely will be 8.5.15.0, which you can also download directly from http://www.activestate.com/activetcl/downloads
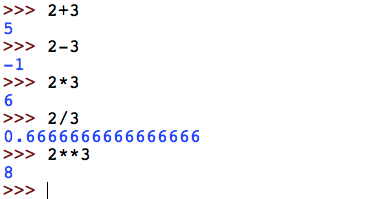
The Python Shell is very useful for quick one-liners and short sequences of commands:
Here we see a number of familiar operations: + for addition, - for subtraction, * for multiplication, and / for division. The last operation shown in the example, denoted by **, happens to be exponentiation. One neat feature to note about Python is that it can store arbitrarily large numbers (limited by the amount of memory your computer has). Trying some hefty exponentiation, we can see that we can compute with some pretty big numbers such as ![]() as illustrated below.
as illustrated below.
While Python can make for a pretty good calculator, it can do a whole lot more. One example is when dealing with strings as follows:
Here we are concatenating the three strings "python", "is", and "cool" by using the + operator. Notice that previously we used + to add numbers but now with strings, Python concatenates them! You may also note that the output of the operation gives us a string with single quotes around it. In Python, you are able to use single quotes or double quotes to denote a string. You can use them interchangeably.
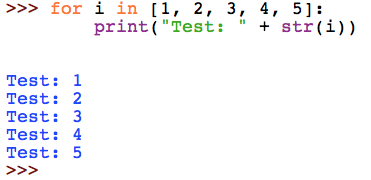
As a final example, we can even write code in the Python Shell that extends beyond a single line as shown below. We also see our first example of a ![]() loop.
loop.
As you type the above, the Python Shell will automatically indent the second line for you. To let the Python Shell know that you're done and are ready for it to run your code, you'll need to put in an extra blank line by hitting the Enter key again. At that point, it should run your code and print your output.
Take some time to play around with the Python Shell. You'll want to go through a more extensive introduction to programming to learn the full extent of what you can do with Python, but you can still do some pretty nifty stuff by just playing around. The Python Shell also has an extensive built-in help system -- just type help() at the ">>>" prompt to get started and then follow the instructions it gives you.
The IDLE Text Editor
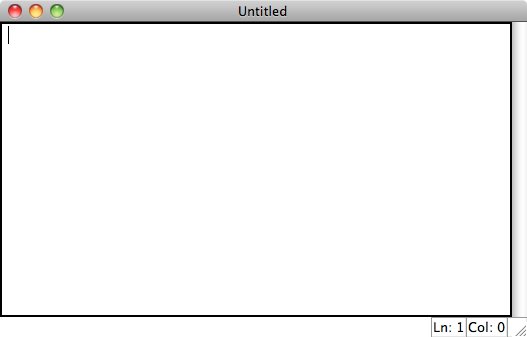
For most programming needs, you'll want to edit your program in a separate document and then run it. Luckily, IDLE comes with its own built-in text editor.
To get started, go to the File menu of the Python Shell and click on "New File". This should give you a blank document with the title "Untitled" as shown below:
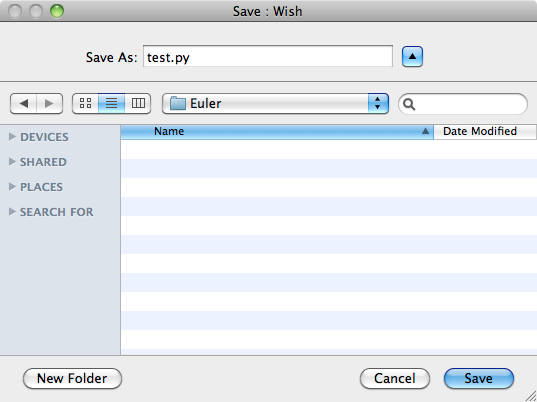
You'll need to save your file before running it, so you might as well save it now. Make sure that you name your file with a file name with a file extension of .py (so it ends with .py), so your computer knows that it is a Python program. Here, we save ours as test.py:
To get acquainted with the text editor, let's write our first Python program! Let's write a program that will do the following task:
Print all the integers from 1 to 50 inclusive.
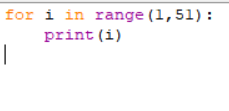
We can achieve this by using a loop that can loop through all the integers. Luckily, Python has a function just for doing that! We use a for loop with the following code:
Note that as you type, the keywords like "for", "in", "range" and "print" get colored in orange or purple!
Also, note that you must copy the exact same indentation. Even though the editor automatically indents for you when you type for i in range(1, 51):, the proper indentation in Python is super important! If you don't do it correctly, the program will not run correctly.
You can indent by pressing Tab on your keyboard.
This for loop means to iterate from 1 to 51 excluding the 51 and including the 1. Every iteration, Python will print out the number that it is iterating through.
Now that you've written this code, you probably want to run it and test it out. You can do so by going to the Run menu and hitting "Run Module" (or by pressing F5 on your keyboard). The ===RESTART=== line means that Python is clearing all the work you've previously done before it starts running your program. The program should execute and print all the integers to the Python Shell. If it didn't, then make sure your code exactly matches the code above. This is what you should get:
If your code worked, congratulations! You have written your very first program! Now, let's try another more useful one.
Find the sum of all the positive multiples of 3 below 1000.
We first need to create a new file. Go into the Python Shell and click on New Window again. Remember, we must save our file first. We can save it as test2.py. Now, on to the coding! We can solve this by keeping a running total: we'll start with the smallest positive multiple of 3 and go up one multiple at a time keeping track of the sum, stopping once we hit 1000. We can do this with the following code:
This is called a while loop. While loops keep iterating until a statement becomes false. Notice that as you type the above code, the keywords ("while" and "print") will automatically get colored -- this makes the code easier to read. Also, after typing the line "while i < 1000:", the editor will automatically start indenting for you. When you get to the line "print(total)", you'll need to use the backspace key to remove the indentation. It is important that the code looks exactly like it does in the screenshot above. Again, in Python, proper indentation is very important!
This program basically works by incrementing the variable ![]() by 3 every time and adding it to the variable
by 3 every time and adding it to the variable ![]() . The
. The ![]() operation might be intimidating at first. However, the statement
operation might be intimidating at first. However, the statement ![]() is just a shorthand for
is just a shorthand for ![]() . (So
. (So ![]() means
means ![]() .)
.)
Run your program, and you should get this:
Again, the ===RESTART=== line just means that Python is clearing all the work you've previously done before it starts running your program. Then, the program runs and we get our answer, 166833. If you instead get an error message or a different answer, check that your program exactly matches the screenshot above, and try it again.
Congrats! You have written your first two Python programs!
Pycharm
Being one of the most popular editors, supporting every language and an extensive extension collection!
Install the free version of Pycharm at
- https://www.jetbrains.com/pycharm/download/#section=mac for Macs,
- https://www.jetbrains.com/pycharm/download/#section=windows for Windows,
- https://www.jetbrains.com/pycharm/download/#section=linux for Linux.
What's Next?
Now that you've learned the very basics of getting Python going, there's a bunch of tutorials you can look at which are listed on the Python website. Go check them out! Another great resource is "Stack Overflow," a forums website built for people who would like to talk about and get help with programming. It is also recommended that you check out a wiki article discussing more advanced python, namely Basic Programming With Python.
Or, you can take our Introduction to Programming with Python online course!


